Jupyter notebooks are highly favored by data scientists for their ability to interactively process data, build ML models, and test these models by making inferences on data. However, there are scenarios in which data scientists may prefer to transition from interactive development on notebooks to batch jobs. Examples of such use cases include scaling up a feature engineering job that was previously tested on a small sample dataset on a small notebook instance, running nightly reports to gain insights into business metrics, and retraining ML models on a schedule as new data becomes available.
Migrating from interactive development on notebooks to batch jobs required you to copy code snippets from the notebook into a script, package the script with all its dependencies into a container, and schedule the container to run. To run this job repeatedly on a schedule, you had to set up, configure, and oversee cloud infrastructure to automate deployments, resulting in a diversion of valuable time away from core data science development activities.
To help simplify the process of moving from interactive notebooks to batch jobs, in December 2022, Amazon SageMaker Studio and Studio Lab introduced the capability to run notebooks as scheduled jobs, using notebook-based workflows. You can now use the same capability to run your Jupyter notebooks from any JupyterLab environment such as Amazon SageMaker notebook instances and JupyterLab running on your local machine. SageMaker provides an open-source extension that can be installed on any JupyterLab environment and be used to run notebooks as ephemeral jobs and on a schedule.
In this post, we show you how to run your notebooks from your local JupyterLab environment as scheduled notebook jobs on SageMaker.
Solution overview
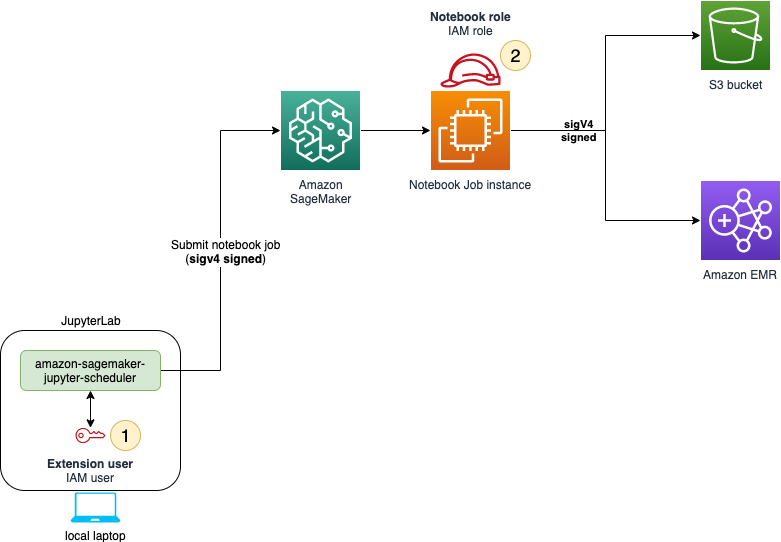
The solution architecture for scheduling notebook jobs from any JupyterLab environment is shown in the following diagram. The SageMaker extension expects the JupyterLab environment to have valid AWS credentials and permissions to schedule notebook jobs. We discuss the steps for setting up credentials and AWS Identity and Access Management (IAM) permissions later in this post. In addition to the IAM user and assumed role session scheduling the job, you also need to provide a role for the notebook job instance to assume for access to your data in Amazon Simple Storage Service (Amazon S3) or to connect to Amazon EMR clusters as needed.
In the following sections, we show how to set up the architecture and install the open-source extension, run a notebook with the default configurations, and also use the advanced parameters to run a notebook with custom settings.
Prerequisites
For this post, we assume a locally hosted JupyterLab environment. You can follow the same installation steps for an environment hosted in the cloud as well.
The following steps assume that you already have a valid Python 3 and JupyterLab environment (this extension works with JupyterLab v3.0 or higher).
Install the AWS Command Line Interface (AWS CLI) if you don’t already have it installed. See Installing or updating the latest version of the AWS CLI for instructions.
Set up IAM credentials
You need an IAM user or an active IAM role session to submit SageMaker notebook jobs. To set up your IAM credentials, you can configure the AWS CLI with your AWS credentials for your IAM user, or assume an IAM role. For instructions on setting up your credentials, see Configuring the AWS CLI. The IAM principal (user or assumed role) needs the following permissions to schedule notebook jobs. To add the policy to your principal, refer to Adding IAM identity permissions.
If your notebook jobs need to be encrypted with customer managed AWS Key Management Service (AWS KMS) keys, add the policy statement allowing AWS KMS access as well. For a sample policy, see Install policies and permissions for local Jupyter environments.
Set up an IAM role for the notebook job instance
SageMaker requires an IAM role to run jobs on the user’s behalf, such as running the notebook job. This role should have access to the resources required for the notebook to complete the job, such as access to data in Amazon S3.
The scheduler extension automatically looks for IAM roles in the AWS account, with the prefix SagemakerJupyterScheduler to run the notebook jobs.
To create an IAM role, create an execution role for Amazon SageMaker with the AmazonSageMakerFullAccess policy. Name the role SagemakerJupyterSchedulerDemo, or provide a name with the expected prefix.
After the role is created, on the Trust relationships tab, choose Edit trust policy. Replace the existing trust policy with the following:
The AmazonSageMakerFullAccess policy is fairly permissive and is generally preferred for experimentation and getting started with SageMaker. We strongly encourage you to create a minimum scoped policy for any future workloads in accordance with security best practices in IAM. For the minimum set of permissions required for the notebook job, see Install policies and permissions for local Jupyter environments.
Install the extension
Open a terminal on your local machine and install the extension by running the following command:
After this command runs, you can start JupyterLab by running jupyter lab.
If you’re installing the extension from within the JupyterLab terminal, restart the Jupyter server to load the extension. You can restart the Jupyter server by choosing Shut Down on the File menu from your JupyterLab, and starting JupyterLab from your command line by running jupyter lab.
Submit a notebook job
After the extension is installed on your environment, you can run any self-contained notebook as an ephemeral job. Let’s submit a simple “Hello world” notebook to run as a scheduled job.
- On the File menu, choose New and Notebook.
- Enter the following contents:
After the extension is successfully installed, you’ll see the notebook scheduling icon on the notebook.
- Choose the icon to create a notebook job.

Alternatively, you can right-click on the notebook in your file explorer and choose Create notebook job.
- Provide the job name, input file, compute type, and additional parameters.
- Leave the remaining settings at the default and choose Create.

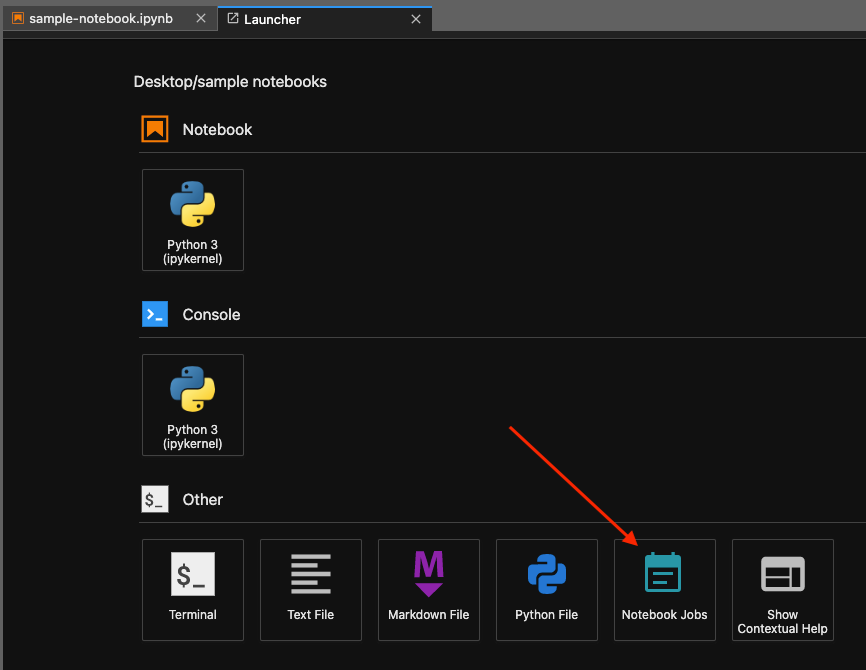
After the job is scheduled, you’re redirected to the Notebook Jobs tab, where you can view the list of notebook jobs and their status, and view the notebook output and logs after the job is complete. You can also access this notebook jobs window from the Launcher, as shown in the following screenshot.
Advanced configurations
From your local compute, notebooks automatically run on the SageMaker Base Python image, which is the official Python 3.8 image from Docker Hub with Boto3 and the AWS CLI included. In real-world cases, data scientists need to install specific packages or frameworks for their notebooks. There are three ways to achieve a reproducible environment:
- At the simplest option, you can install the packages and frameworks directly on the first cell of your notebook.
- You can also provide an initialization script in the Additional options section, pointing to a bash script on your local storage that is run by the notebook job when the notebook starts up. In the following section, we show an example of using initialization scripts to install packages.
- Finally, if you want maximum flexibility in configuring your run environment, you can build your own custom image with a Python3 kernel, push the image to Amazon Elastic Container Registry (Amazon ECR), and provide the ECR image URI to your notebook job under Additional options. The ECR image should follow the requirements for SageMaker images, as listed in Custom SageMaker image specifications.
In addition, your enterprise might set up guardrails like running jobs in internet-free mode within an Amazon VPC, using a custom least-privilege role for the job, and enforcing encryption. You can specify such configurations for your notebook jobs in the Additional options section as well. For a detailed list of advanced configurations, see Additional options.
Add an initialization script
To showcase the initialization script, we now run the sample notebook for Studio notebook jobs available on GitHub. To run this notebook, you need to install the required packages through an initialization script. Complete the following steps:
- From your JupyterLab terminal, run the following command to download the file:
- On the File menu, choose New and Text file.
- Enter the following contents to your file, and save the file under the name
init-script.sh: - Choose
scheduled-example.ipynbfrom your file explorer to open the notebook. - Choose the notebook job icon to schedule the notebook, and expand the Additional options section.
- For Initialization script location, enter the full path of your script.

You can also optionally customize the input and output S3 folders for your notebook job. SageMaker creates an input folder in a specified S3 location to store the input files, and creates an output S3 folder where the notebook outputs are stored. You can specify encryption, IAM role, and VPC configurations here. See Constraints and considerations for custom image and VPC specifications.
- For now, simply update the initialization script, choose Run now for the schedule, and choose Create.
When the job is complete, you can view the notebook with outputs and the output log under Output files, as shown in the following screenshot. In the output log, you should be able to see the initialization script being run before running the notebook.

To further customize your notebook job environment, you can use your own image by specifying the ECR URI of your custom image. If you’re bringing your own image, ensure you install a Python3 kernel when building your image. For a sample Dockerfile that can run a notebook using TensorFlow, see the following code:
Conclusion
In this post, we showed you how to run your notebooks from any JupyterLab environment hosted locally as SageMaker training jobs, using the SageMaker Jupyter scheduler extension. Being able to run notebooks in a headless manner, on a schedule, greatly reduces undifferentiated heavy lifting for the data scientists, such as refactoring notebooks to Python scripts, setting up Amazon EventBridge event triggers, and creating AWS Lambda functions or SageMaker pipelines to start the training jobs. SageMaker notebook jobs are run on demand, so you only pay for the time that the notebook is run, and you can use the notebook jobs extension to view the notebook outputs anytime from your JupyterLab environment. We encourage you to try scheduled notebook jobs, and connect with the Machine Learning & AI community on re:Post for feedback!
About the authors
 Bhadrinath Pani is a Software Development Engineer at Amazon Web Services, working on Amazon SageMaker interactive ML products, with over 12 years of experience in software development across domains like automotive, IoT, AR/VR, and computer vision. Currently, his main focus is on developing machine learning tools aimed at simplifying the experience for data scientists. In his free time, he enjoys spending time with his family and exploring the beauty of the Pacific Northwest.
 Durga Sury is an ML Solutions Architect on the Amazon SageMaker Service SA team. She is passionate about making machine learning accessible to everyone. In her 4 years at AWS, she has helped set up AI/ML platforms for enterprise customers. When she isn’t working, she loves motorcycle rides, mystery novels, and long walks with her 5-year-old husky.
